Armand de Sevigny saddle page
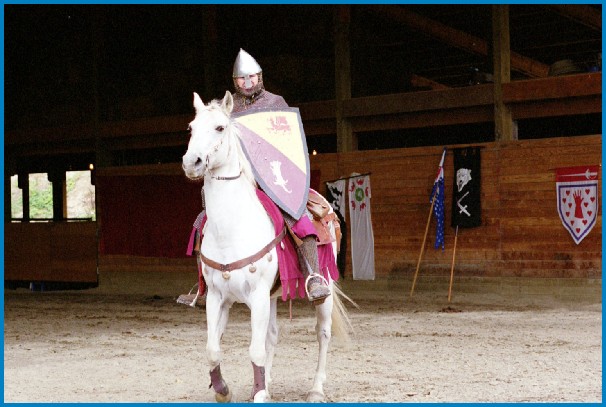
(below) Sir Armand on Tristan circa 1190, riding in a medieval saddle with simple leather bardings. He wears his usual complete mail hauberk and chauses, and a conical helm. This would have been fairly typical war combat accouterments for a knight of the period. The closed-face helm and surcoat were still not in universal use in Western Europe at that time.
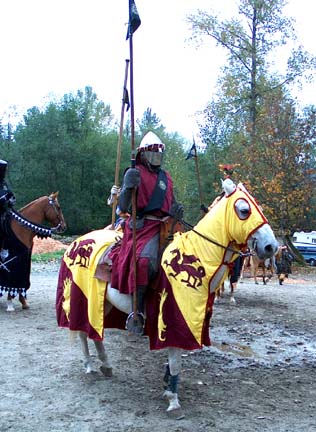
(Left) shows Sir Armand on Tristan, circa 1215, riding in clothe heraldic bardings, which completely cover the horse. This is how Armand would have appeared at the Battle of Bouvines in 1214, near the end of his career.
Armand made these Medieval saddles. Read his article to see how. Print out the article by clicking on the 'saddle.doc'
Reproduction of the Early Medieval Knight's Saddle
by Sir Armand de Sevigny
[The following is a re-writing of an article done some twenty years ago by Sir Armand for the Caid Leathercrafters Guild's newsletter Tanned Hydes. Although the errors in the printed portions of that article have been removed, Sir Armand apologizes for the elemental nature of his drawings included therein.]
The saddle of the medieval knight was essential to his effectiveness as a heavy cavalryman. By the end of the Eleventh Century the saddle had evolved into the basic form it was to maintain for the next four hundred years. The front piece, the pommel, was high and broad, as was the back of the seat, the cantle. Typically the cantle was curved forward to cradle the knight's hips. A reproduction of a typical early medieval saddle [1050-1350 AD] can be made by anyone with rudimentary leather and woodworking skills and a degree of patience and imagination.
The place to start is with the saddle's foundation, the saddle "tree". The tree is basically two shaped wooden "planks" that straddle the horse's rib cage on either side of the backbone. These planks are secured by the wooden "pommel" and "cantle" fore and aft respectively. Because construction of a well-fitting saddle tree is beyond the artistic capacities of most of us, and because the proper shape and fitting of the tree is absolutely essential to the comfort of the horse, I would recommend against producing your own tree unless you are an expert with horses, saddles, and carpentry to begin with. Even then, I would recommend going to a local horse trainer or saddle maker for assistance or suggestions.
For those of us less ambitious or artistically gifted we need to purchase a saddle tree. I've found old U.S. Army McClellan saddle trees have many advantages. The McClellan is mostly known for its service as the Union cavalry saddle of the American Civil War, but it remains in limited service up to the present. The greatest difficulty is finding one in some parts of the country. Since you are going to be stripping it to the rawhide and riggings, the condition of the saddle's leather is of no importance unless you can find one in perfect condition. In that case you can save some of the work and expense of recovering it. Decrepit old McClellans can be found in rural tack stores, or at equipment auctions. Civil War recreation groups may also have sources. Depending on its condition, the McClellan can range from $25 to $300. If you are of a medium to large build only buy one that has a seat size of 11 ½ inches or more. The seat size is usually stamped on a shield-shaped brass plate attached to the top of the pommel.
STEP 1: Stripping the Tree
If the leather on the tree is not in good condition or repairable, strip the existing leather off the tree, being careful not to remove or damage the rawhide beneath. Unless the rawhide is badly torn up, leave it on for extra strength and protection. Any cracks in the rawhide should be cut away or glued down.
On a typical McClellan, the rigging straps and the rectangular metal rings [for attaching the billets and girth ring ] run over the front of the pommel and behind the cantle. Carefully remove and preserve these fixtures and the straps [ if they are in good condition ]. After the tree is stripped these rigging straps and rings can be re-attached using heavy copper or brass rivets or heavy-duty wood screws. One-half inch to three-quarter inch black iron carpet tacks will be indispensable to you at this and later stages of the project. When the rigging is secured back on to the tree, you are ready to start building.
STEP 2: Modifying the Tree
This step is a matter of carpentry and ascetics. Decide what shape you want for the cantle and pommel. [See diagram #1.] Make cardboard templates of both. The new pommel and cantle pieces should rest on top of the re-attached rigging straps.
The New Pommel
Starting with your pommel template, cut a piece of plywood [of at least 1 inch thickness], in the desired shape. Then carefully sand down the interior side [the side facing the rear of the saddle] until it fits flush with the existing McClellan pommel. The front of the McClellan pommel is slightly convex, but once you have "hollowed" your new pommel piece use large flathead woodscrews and glue to attach it the front of the existing pommel. Then reinforce the interior joinder of the new pommel by taking two or three metal strips, shaping them to the curve of the top of the existing pommel, placing them on each side and on the top-center of the old pommel, and extending them at least 1 ½ inches up the interior side of your new pommel. [See diagram #2.] I generally use galvanized steel joinder plates, 1 3/4 inch by 5 inches and approximately 1/16 inch thick, that can be purchased in any hardware store. These plates already have a dozen holes drilled through them and are thin enough to be easily hammered or bent into the appropriate shape. Use small diameter, but long wood screws [at least six in each plate] to fit these plates securely to the new and old pommel, then sand down the screw heads flattening them to about the dimensions of common nail heads.
The New Cantle
The cantle posed a more serious challenge due to its acute curve. The new cantle also comes in two parts, a cantle frontpiece and rearpiece. To make each piece I use a "shield press" to create layers of glued curved plywood on a rectangular piece larger then the template for the new cantle. The cantle front piece will be about ½ inch thick while the rearpiece should be at least 3/4 inch thick. Allow each of the newly glued pieces to dry thoroughly [and separately] in the press. Remove these pieces from the press. Cut the new cantle rearpiece from one of the pieces. This rearpiece should rest on the rigging straps behind the cantle. Glue and screw the cantle rearpiece to the back of the existing McClellan cantle in much the same fashion as you did with the pommel addition in the front. Allow the glue to dry thoroughly. Then cut the cantle frontpiece from the second curved piece of wood. It should be cut to fit over the top edge of the old McClellan cantle and be of the same shape on the upper three edges as the new cantle rearpiece. [See diagram #3] This piece should be glued and clamped to the interior surface of the rearpiece above the old McClellan's existing cantle. This bond should be further reinforced by flathead woodscrews, with the screws inserted towards the rear of the saddle. The purpose of the cantle frontpiece is to bring the new medieval cantle flush with the front surface of the old cantle. Once all the glued surfaces have dried, sand lightly and strengthen with more glue or screws as needed.
STEP 3: Recovering the Saddle Tree
Before starting the leather work in earnest I would suggest you obtain a book on leather work in general or one on the construction of western saddles. I recommend Making and Repairing Western Saddles by Dave Jones. It contains a good outline on the tools and techniques needed for saddle-making, including a list of various "finishing tools" which will enhance the professionalism of your project.
If the entire tree needs to be recovered in leather, you should purchase a large hide of saddle leather, either 8-9 oz. Or 10-11 oz. The 10-11 oz. Is excellent for those areas which will suffer the most wear and abuse. Again templates should be cut, this time of clothe, to determine the shape of the necessary pieces.
Unless you are very experienced at shaping wet leather, I recommend at least seven separate and numbered pieces for:
2. Pommel rear-surface to mid-seat,
3. Actually two pieces, one for the top mid-section of each plank, usually starting just behind the rectangular stirrup leathers' rings,
4.The cantle frontpiece extending down and forward to cover the entire seat area of the cantle and planks,
5. The rearpiece of the cantle and the planks that extend out beyond it,
Diagram 4 shows the general position of each of each pieces.
Each piece should be cut larger then needed, thoroughly soaked in water, applied and patiently shaped to conform to the tree. Each piece, starting with the under surface, should then be nailed in place temporarily and allowed to dry completely. The nails should be inserted in places where they will not show on the finished saddle and should not be pushed in so far as to make them difficult to remove later. Once dry, trim and finish the edges, and double check the fit. Complete each piece separately at this point, working from front to back after the undersurfaces are covered, and permanently glue the pieces to the tree. Although you can use leather glue, I have actually found contact cement to work best. In some places flatheaded carpet nails can now be used to help hold down the edges - such as the edges between pieces numbered 2, 3, and 4.
If your pommel or cantle have square corners and require the leather to be slit there to fold down properly, these corners can be laced together or covered with custom-made metal pieces to protect them from wear.
Next you will want to cover the seams of those leather pieces of the tree which will be visible even after you add the seat and skirting. The seams between the front and rear pieces of the pommel and cantle can be covered by cutting and edging belts of leather. These are then positioned running along - and over - the seams. The thickness of these belts should be marginally narrower then the thickness of the wooden pieces they cover. They can either be stitched in place, or more simply glued and nailed into place with decorative nails. [See diagram #5.] Be sure to place the nail through the wood and not just the leather covering the tree.
STEP 4: The Skirting and Seat
After doing the rough finishing work on the saddle tree, you are ready to start on the saddle skirting. The skirting can be made of any heavy and durable material. It could be of heavy leather, light leather, reinforced or lined brocades, or drapery materials. Medieval skirtings can assume a variety of shapes. [See diagram 6.] Whatever the shape or material, the skirting should be made of two pieces, one for each side of the saddle. Each side piece will be joined together down the center of the seat by lacing or sewing. Also, to the extent the skirting is designed to fit behind the cantle, it can be joined either by buckles or lacing. Sometimes a separate piece is created to extend over the back seam and laced, riveted, or otherwise joined to cover the seam. If the skirting extends in front of the pommel, it can be designed so that it extends only up over the top of the planks. The front of the skirt can also be designed come together about the level with the gullet. The gullet is the space beneath the pommel and between planks and the horse's back and withers. If you intend to join the skirting together in front of the pommel be sure to leave enough room to allow for the movement of the horse's withers when ridden.[See diagram 7.]
In either instance the front portion of the skirt must be secured by a decorative bolt, screw, or equipment hook to the top of the plank on each side. In like manner, the skirt should also be secured to the planks behind the cantle. It is absolutely necessary that the skirt be firmly fastened at both ends of the saddle, but in a manner that allows it to be removed for repair or cleaning.
Next decide what type of seat you would like. The seat, not to belabor the obvious, is that part of the saddle on which you actually sit. There are some examples in contemporary illustrations of skirting without any apparent separate seat. In these the skirting is invariably depicted as being of a quilted material and the seat has apparently merely been incorporated into the design of the skirting as a whole. Often, though, the seat is shown as a separate unit. It can be of rectangular shape, of soaked and dried smooth saddle leather, or padded and quilted and made of velvet or glove leather. In any event, if it is not incorporated into the skirting, it must be securely fastened to the skirting so that it does not move or shift or easily come loose. Western seats are frequently attached on each side front and back by thongs running through "conchos" and then tied off. [See diagram 8.]
STEP 5: The Stirrup Leathers and Stirrups
Next you must make or acquire the stirrups and stirrup leathers. I usually just purchase the stirrup leathers from a local saddle shop. Good long English saddle stirrup leathers, although not cheap, are stronger and less prone to stretching then most you could make yourself. [The last ones I bought were labeled as rhino-hide!?] However if you must make them, create the straps out of the thickest, strongest leather you can find. The leathers can usually be slipped through the rectangular stirrup ring located on most McClellans just behind the pommel on the lower edge of the planks. If these are not present you will want to purchase a pair of heavy steel rings and attach them to the planks with heavy leather straps by way of nails and rivets. The leathers are then looped through the stirrups and the leathers are buckled at the appropriate length.
Once buckled the buckles are shifted up under the skirting as high as possible until almost touching the planks; this prevents the buckles from your the inside of your legs.
STEP 6: Riggings and Girths
Now all that remains is to create the means to attach your saddle to your horse. If you have used a McClellan tree and incorporated or recreated the original rigging straps there will be two square or circular "rigging" [my term] rings on each side of the saddle, each just below the pommel and cantle. From these rings attach heavy leather straps down to a large central ring. This ring should be 4-5 inches in diameter. From this large ring is slung the leather billet [usually about 2 inches wide] that is buckled to the actual girth. This billet/girth ring should be positioned so that when the saddle is placed on the horse it is positioned almost straight down from the front rigging ring. [See most photographs of Civil War Union cavalry or officers on horseback for examples.]
If you are new around horses and saddles before you settle on the exact position of the billet/girth ring, you might want to talk to someone more knowledgeable. The nuances of proper rigging cannot be adequately covered here. There are so-called "center" rigs [which include McClellans and most English saddle types], "three-quarter" rigging, "double" rigging, "seven-eighths" rigging, etc.
However, whatever you do for rigging, if you intend to ride in armor, always use a breaststrap. A breaststrap or breastcollar is buckled to a strap which is in turn looped or otherwise attached to either the girth ring or rigging ring. The reason is elemental. The purpose of the breaststrap/collar is to keep the saddle from slipping backwards on the horse. A saddle which slips back from its proper position is more likely to be loose and to "roll" to the side with the shift in the rider's weight. This propensity - and the danger it causes - is exaggerated when the rider is in armor and in a medieval knight's saddle. Armor tends to elevate the center of gravity of the rider as well as increase his weight. Therefore, any lateral shift in the rider's weight has a greater effect on the stability of the riding "platform". If the saddle comes loose and the rider's weight shift causes it to roll suddenly sideways there is a serious chance the saddle will continue to slip literally under the horse. Unfortunately the very qualities that make the medieval saddle a fine fighting platform for the knight also make it very difficult to exit in a timely fashion. To decrease the risk of this occurring, please always use a breaststrap when using a medieval saddle, especially when riding in armor.
Much like riggings, everyone has their own preference on girths. A trip to your local saddlery will educate you on the types commonly used. My only concrete suggestion is to avoid the macrame ones.
In Closing
If you are an experienced rider you already know some of the problems associated with ill-fitting or poorly made saddles, and have opinions on such things as rigging and girths. If saddle-making is your first excursion into the world of horses, latch on to an experienced rider, preferably a trainer, show him or her what you want to do and get their advice. A note of caution; most modern instructors and riders will openly dislike the medieval saddle. Their reasons are endless; it is confining, the seat's too hard or too narrow, you can't get in easily, or get out very quickly if you are in trouble. All these observations have merit from the modern perspective. But if you want to know how it felt to be a knight, there is no more authentic and exciting place to experience it then on horseback, and in the type of saddle that allows you - or forces you - to ride as they rode.
- Sir Armand de Sevigny, Duc.